all data is live and searchable
« Back .
[Adilas youtube training videos for me] .
[Adilas steps to success - user guide (under construction)]
. [Adilas "quick search" help]
[Adilas university] . [all Adilas help files] . [developer's notebook] . [Adilas web/api documentation] . [contact Adilas support - email form]
[online glossary] . [presentation gallery - outline]
[Adilas university] . [all Adilas help files] . [developer's notebook] . [Adilas web/api documentation] . [contact Adilas support - email form]
[online glossary] . [presentation gallery - outline]
More info below the graphic...
|
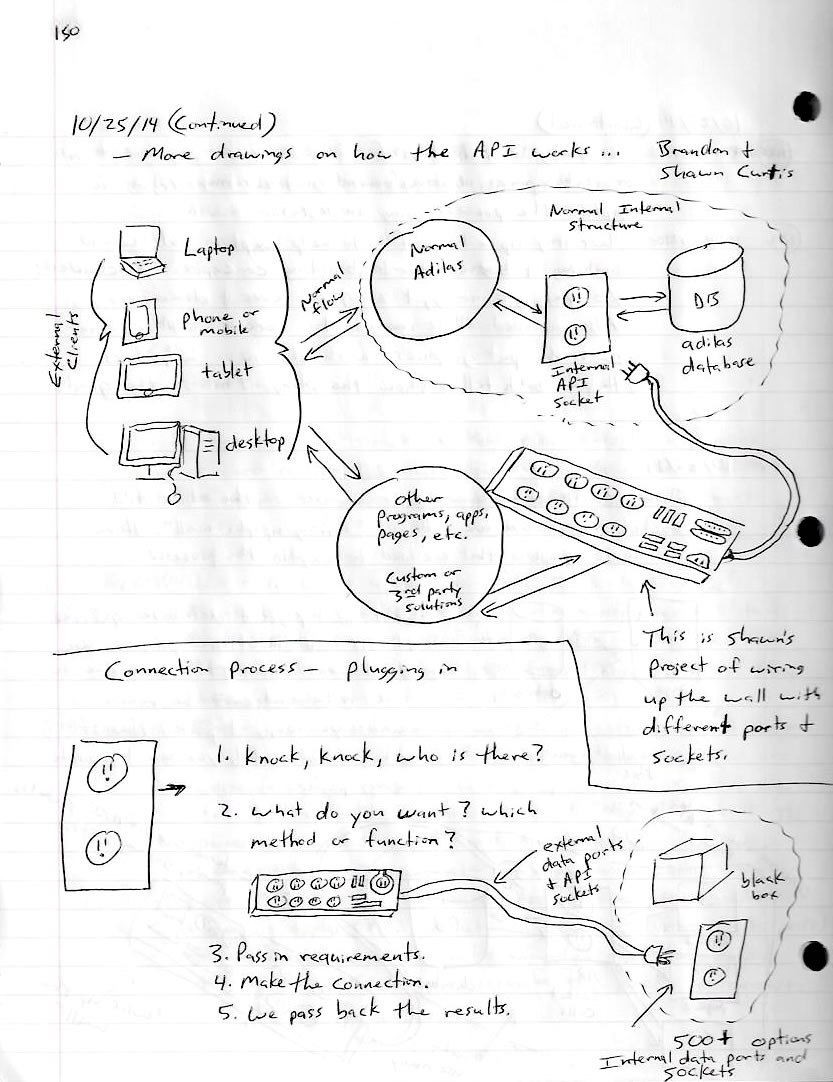
Showing and viewing the Adilas.biz API Socket Connection
|
|
Videos:
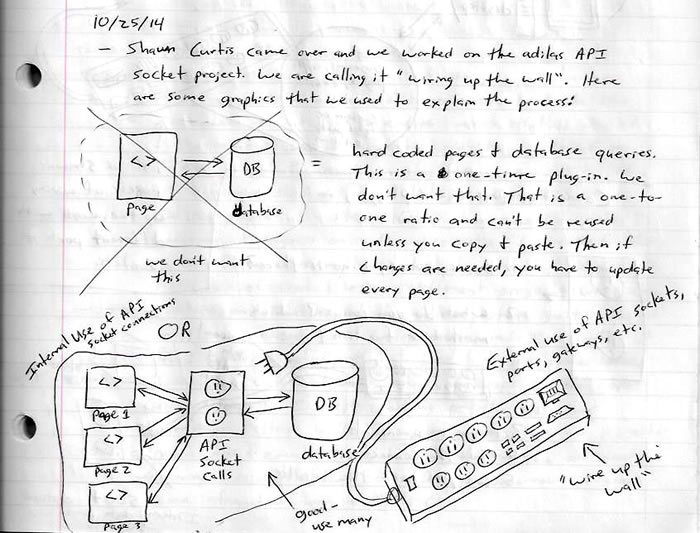
Video 1 - Small 5 minute video on setting up the Adilas API sockets (internal settings) Video 2 - Small 5 minute video on using the pre-built visual display for the adilas API sockets (getting started) Video 3 - Small 5 minute video on coding the actual Adilas API sockets (actual coding) Welcome to the Adilas.biz API. The acronym API stands for an Application Programming Interface. If you are new to API's, think of them as a socket, data port, adapters, or a computer to computer connection for data exchanges. A good analogy is an electrical outlet on the wall. If you have the right plug, cord, or device, you can plug it into the wall to get access to the power or electricity that has been wired into the outlet. An API socket or data port is very similar. Think about plugging an outside device or application into the Adilas.biz logic and backend database. We do this using a special socket or connection called an API. Pretend that there are both real walls and virtual walls that are built all the way around the normal Adilas.biz application. These walls require a user to login and go through correct channels in order to play with backend pieces (databases). There are permissions, settings, pages, functions, ect. This is all wired up behind the walls. This is how the users interact with the normal Adilas platform or internal Adilas structure. These pieces exists right now. By providing the API sockets or data ports (external connections), we can allow any outside 3rd party or other application to virtually "Play at the wall". The wall, is the API socket interface that is customer facing (exposed to the public). So, if people play at the wall, they are virtually plugging into the Adilas backend code and functionality. We have coded the wall with sockets, data ports, windows, hooks, and access points. As long as those connections are made correctly and the data requests pass all of the validation, we will let the actions go through as if they came from an internal or trusted source. The API sockets and data ports may be turned on/off from inside the main Adilas.biz application. If a port or socket has not been turned on, it won't allow the connection to take place. Think of this like a master switch to say - allow or don't allow outside interactions. By default, all sockets and data ports will be turned off (deny access) until expressly turned on. This allows the different corporations (worlds) to control what kind of access is allowed and/or wanted. The Adilas API socket connections come in two flavors. They are "pre-built visual mode" and "raw live mode". Both flavors interact with live databases. The main difference is that the show mode is pre-built by Adilas and has a visual display of the objects that get passed in/out (you get to see the plug, the socket, and the connection). We virtually hold your hand to help you make the connections. The live raw mode does not have a pre-built front end or visual interface. The live mode deals with raw data access. The live mode gives you direct access to any of the underlying data ports without any pre-built wrappers. With the live mode, we let you build, customize, design, engineer, and/or determine the interface. The API connections are done behind the scenes and are basically transparent to the end user. This type of interaction could be from your own app, standalone software, a 3rd party solution, etc. The sky is the limit. Using the live mode allows you to connect directly to the wall outlet or socket (going to the source). Once the connection has been made, you can then do with it (the data) as you see fit. This is where the real power is... :) API Pre-Built/Visual Interface Mode: To help with showing the actual connections, we have built an easy to use page at the following URL: (as a note, this same page exists for all servers - in-case you need to switch servers) https://data0.adilas.biz/web/show_adilas_api_calls.cfm (main server or data 0) https://data1.adilas.biz/web/show_adilas_api_calls.cfm (data 1) This pre-built visual page is setup to simulate the actual process that happens when an API socket/connection call is made. All of the data is live, it just runs over a pre-built structure for easy testing and debugging. This page is divided into three main sections or steps. They are: Step 1 - This is where you prep your values and then convert those values into the correct format. Think of this step as getting your device ready to plug in. Nothing has really happened yet, we are just getting ready. Step 2 - This step will take all of the form field values that you have provided and will format them into an object that may be passed to the API. This step will show the formatted data of what will be submitted to the API. In our analogy, this is like plugging in your device to the wall. You still have to turn it on, but at least the plug should be formatted to fit the API socket. Step 3 - This is the final step and is basically saying yes, let's turn it on and see what happens. Once step 3 is submitted, it will actually run the API call and will then show the results. The results will vary based on the pieces that were passed in and what function and/or method you are trying to call. ** As a note, all of these connections are live or real even if using the pre-built visual mode. The main difference is the user interface or wrapper that the data gets called and passed back in. Once again, both the pre-build and live raw mode interact with the real backend databases. API Live/Raw Interface Mode: The live Adilas API is called through a direct HTTP post with a single form field. The name of the form field is "call_function_data". The value of the form field "call_function_data" needs to be a valid JSON object or a valid WDDX packet. As an example: This is a live API call using Adobe ColdFusion: ------------------------------ cfhttp url="https://data0.adilas.biz/web/adilas_api_calls.cfm" charset="utf-8" method="post" resolveurl="no" timeout="20" cfhttpparam type="formfield" name="call_function_data" value="#Trim(FORM.call_function_data)#" cfhttp ------------------------------ (as a note, all opening and closing tags have been removed so that this help file could show the code.) The server names may change, but the rest of the file path will not. Some of the other servers are: https://data0.adilas.biz/web/adilas_api_calls.cfm (main server or data 0) http://data1.adilas.biz/web/adilas_api_calls.cfm (data 1) The live API calls go directly to the "adilas_api_calls.cfm" page. The pre-built visual environment uses a page called "show_adilas_api_calls.cfm". Notice the small change to the page name (adding the word show_ to the pre-built visual page). The visual mode then connects to the live adilas_api_calls.cfm page to show what would really happen. We recommend using the POST option and using FORM fields. However, if you are using a GET type request (URL based request) vs a POST (form field requests), here are a few pointers: 1. Basically, you point to the correct server - Pretend we were on the data 6 server: (https://data6.adilas.biz/web/adilas_api_calls.cfm) 2. Put a question mark to start a query string (?) 3. Set a URL variable called "call_function_data" 4. Put an "=" sign to denote that a value will follow 5. URL encode the whole JSON object 6. Send it and see what happens It might look something like this: https://data6.adilas.biz/web/adilas_api_calls.cfm?call_function_data=fullURLEncodedJSONObject The information listed below is virtually a "knock-knock, who's there" for computers, servers, and users. This is how we connect to the API socket or data ports. The JSON object or WDDX packet that gets passed in must have the following information: API_CORP_KEY_ID 1: Corporation Key - This is a combination of the corp_id number and part of the name of the corporation whose information you're looking for. This will be used for validation and security. A corporation with the name FunTown, and a corp_id of 44, would have the following corporation key "fun-0044". Basically, it is the first three letters of the corporation name, a dash (-), and the corp id number. The id portion may be padded with zeros but that is not required. As a note, some corporations may use a unique "alias" (virtual username for their corporation or world) instead of the traditional format listed above. That is totally allowed and the corporation will know if they have setup an alias value. API_USER_NAME 2: User Name - The username and user password are set by individual corporations when they enable the API access. This is done from the 3rd Party Solutions page inside of Adilas. The username has a minimum of 4 characters and a max of 50 characters. API_USER_PASSWORD 3: User Password - The password is also set by individual corporations when they enable API access. This is done from the 3rd Party Solutions page inside of Adilas. API_CURRENT_PAYEE_ID 4: Current User Id – For most of the demos, we use 3 as the default. For live, you will need to get the actual user or payee id number from inside the system. The API is locked down to only certain user id numbers per corporation. If you need help, contact an administrator and they can get you a valid id number. API_INPUT_OUTPUT_TYPE 5: Input/Output Type – Pass in the string "JSON" or "WDDX". This will specify the inbound format and the outbound format for the API connections. As a reference, JSON stands for Java Script Object Notation. WDDX stands for Web Distributed Data eXchange (a subset of XML). API_URL_ENCODING 6: URL Encoding – pass in the string "auto" (default) or "full". This is a setting that helps us return the data in URL Encoded format. Certain values will be URL encoded as needed (this is the auto setting). The full setting means all values will come back as URL encoded. This helps while transferring data between computers. Once on your side of the fence, you may need to URL decode the values to use them. Most scripting languages have pre-built functions to translate between URL encoded and URL decoded values. If you need a link to the free URL encoder page... [url encoder page] API_CALL_FUNCTION_NAME 7: Method Name Or Function To Call – This argument is VERY IMPORTANT. This is the name of the API piece that you want to use. Think of this as the what or the main request for the API call or connection. For example: addCustomer, startMainInvoice, getAllTitles, etc. Additional Method/Function Arguments 8: Additional Arguments – The number of additional arguments/parameters may vary. Every function call or method requires at least one argument to be passed in. Each additional argument has two required parts or pieces. They are the argument name and the argument value. These are basically variable/value pairs. This is an example of an additional argument. "EXAMPLE_1":"Sample Text" Argument Name: This is the name of the argument. In our example, this the value "EXAMPLE_1". The other argumets could be things like "CORP_ID", "STORE_ID", etc. Please use all CAPS for all the argument names. The values may be any case. Argument Value: This is the value that will correspond to the Argument Name. For our example, this is the value "Sample Text". These values may contain mixed cases, strings, numbers, decimals, dates, etc. No special requirements exist for letter casing. Any passed in value may be mixed, upper, or lower case. As a note, all incoming values will be run against specific validation routines to ensure data integrity. API Results: The API results will be in the same format as the inbound call (JSON or WDDX). Every API call will have at least four basic results. Depending on the call or function that was called, the results may have additional pieces but each call will have these four main results every time. The four basic results are: RET_TYPE - This will most likely be "success" or "error". RET_STATUS - This is the key to the whole thing. If it is "ok", this is the result you are looking for. If it is not set to ok, it will have a different value that correlates to an error message of some sort. See below for a tip on checking this status value. Once again, this is the key to figuring out the return portion of the Adilas API calls. RET_MAIN_MESSAGE - This is the human readable way we can talk back to the user to let them know what is going on. This value will change depending on what is needed. This value is the top line of a two part message back to the user. Often it will include notes and directions. It is also possible that is may be blank. Once again, key off of the RET_STATUS value. RET_SECOND_MESSAGE - This is the second human readable message. This value will often give additional details or explain things in more detail. This is part of the built-in success and error handling of the API calls. At times, this value may be blank as well. That is ok. We recommend that you key your logic off of the RET_STATUS value. There may be other key values passed back based on the method or function call that was made. The details on what will be passed back depends on the method or function call. Tip: We recommend that after you get the data object back that you base all of your logic off of the RET_STATUS value. For an easy way to do built-in error handling, we recommend that you check for anything that is NOT the value of "ok". If it is "ok" - this helps you assume all is well. If it is anything else (meaning it is not ok), we recommend that you roll right over to the built-in error handling messages. This is what we do internally inside of Adilas. The reason we do this, is the RET_STATUS value will always be "ok" if we got a success message back. RET_STATUS could be any other value and if so, most likely, there will be a corresponding error message to go with it. Anyways, there is a tip for you. :) If additional help is needed, contact Bryan Dayton for personal help and direction. He welcomes calls and questions. His contact info is: Bryan Dayton Adilas developer 435.760.2737 (cell) bryan@adilas.biz If you are looking for the AI mini or miniAPI socket help file - click here. Nav Help - To go to this actual page inside the system, click this prompt link api documentation. You can also use this same prompt or keyword in the AI quick search to get there as well. |