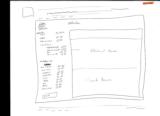
all data is live and searchable
|
Basic Assignments
|
Options & Settings
|
Main Time Information
|
||||||||||||||||||||||
|
|
|
|
|
|||
|
|||
|
|
|
Notes:
|
|
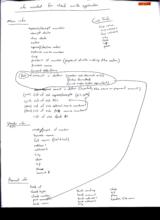
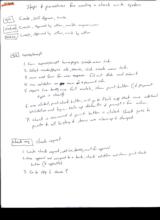
Info needed for check write application: Main Info: - Expense/receipt number - Receipt date - Due date - Notes - Approval/decline notes - External invoice number - Corp - Printer’s id umber (payee id of who is doing the action) - Printer’s name - Current date/time - Pmt – amount in dollars (number and decimals only), (dollar formatted), (word and/or letter equivalent) - Main expense amount in dollars (hopefully the same as payment amount) - (Ours) List of sub expense/receipts (rei’s, splits) - (Ours) List of sub PO’s - (Thiers) List of sub external invoice numbers (rei’s, splits) - (Theirs) List of sub PO invoice numbers - List of sub stock #’s Corp Info: - Corp name - Corp address 1 - Corp address 2 - City - State - Zip - Phone Vendor/Payee Info: - Vendor/payee id number - Business name - Full name (first & last) - Address 1 - Address 2 - City state - Zip - Phone - Account # Payment Info: - Bank id - Check type - Check number - Pmt amount – amount in dollars (number and decimals only), (dollar formatted), (word and/or letter equivalent) - Bank name - Bank routing - Bank account - Bank address 1 - Bank address 2 - City - State - Zip - Phone - Signature file name Steps & procedures for creating a check write system: E/R – Create, self-approve, write Check Req – Create, approved by other, write original owner Check Req – Create, Approved by other, write by other E/R – Expense/Receipt: 1. From expense/receipt homepage, create new link. 2. Select vendor/payee info, search, click create new link. 3. Main add form for new expense. Fill out data and submit. 4. Run validation on main info and payment info. 5. Require line item(s), once full match, show print button (if payment type is check). 6. Once clicked, print check button, will go to flash app that runs additional validation and logic. Sets up defaults and prompts for action. 7. Check is reviewed and print button is clicked. Check goes to printer and all history and items are cleaned-up stamped. Check Req – Check Request: 1. Create check request, add line item(s), wait for approval 2. Once approved and assigned to a bank, check validation and show print check button (if applicable) 3. Go to step 6 above Adilas Check Request sketch/layout (Please see scan in photo gallery) |